Today I am going to discuss how to upload multiple files from your computer with uploadify in MVC4.
As we all know MVC is a standard design pattern developed to reduce and manage the complexity of web application development. ASP.NET MVC is a web development framework for .NET developers. Uploadify is a JQuery control that allows the integration of single or multiple file uploads on your website.
Basic upload functionality implementation is like this.
1. Create MVC 4 or whatever project you want.
2. Download latest Uploadify version from their website (Free version).
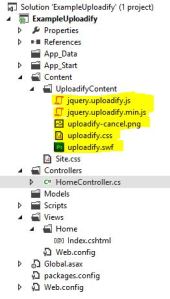
3. Import these highlighted files anywhere in your project.
4. Your Index view appears like this.
@{
    ViewBag.Title = "Index";
}

<!DOCTYPE html>
<html>
<head>
    <meta name="viewport" content="width=device-width" />
    <title>Upload Files</title>
    <script type="text/javascript" src="@Url.Content("~/Scripts/jquery-1.7.1.min.js")"></script>
    <script type="text/javascript" src="@Url.Content("~/Content/UploadifyContent/jquery.uploadify.js")"></script>
    <script type="text/javascript" src="@Url.Content("~/Content/UploadifyContent/jquery.uploadify.min.js")"></script>
    <link rel="stylesheet" type="text/css" href="@Url.Content("~/Content/UploadifyContent/uploadify.css")" />

    <script type="text/javascript">
        $(function () {
            $('#file_upload').uploadify({
                'swf': "@Url.Content("~/Content/UploadifyContent/uploadify.swf")",
                'cancelImg': "@Url.Content("~/Content/UploadifyContent/uploadify-cancel.png")",
                'uploader': "@Url.Action("Upload", "Home")",
                'onUploadSuccess' : function(file, data, response) {
                     $("#uploaded").append("<img src='" + data + "' alt='Uploaded Image' />");
                }
            });
        });
    </script>

</head>
<body>
    <div>
        Click Select files to upload files.
        <input type="file" name="file_upload" id="file_upload" />
    </div>
    <div id="uploaded">
    </div>
</body>
</html>
5. Controller code is here.
        public ActionResult Index()
        {
            return View();
        }
        public ActionResult Upload()
        {
            var file = Request.Files["Filedata"];
            string savePath = Server.MapPath(@"~\Content\" + file.FileName);
            file.SaveAs(savePath);

            return Content(Url.Content(@"~\Content\" + file.FileName));
        }
6. Enjoy using uploadify in your projects 🙂


